Fragment The Collaborative Spectral Synthesizer by Julien Verneuil - contact@fsynth.com This is the old HTML documentation of the Fragment synthesizer which is still updated to some extent. The new documentation can be found here The old PDF documentation (still updated) can be found here
Table of Contents 1. Introduction 1.1. History 1.2. Capabilities 1.3. System requirements 1.3.1.Browser 1.3.2.CPU 1.3.3.GPU 2. Concept 2.1. Additive synthesis 2.2. The graphical score 3. Sessions 3.1. Homepage and sessions history 4. FAS 5. The user interface 5.1. Dialogs 5.2. The information bar 5.3. The graphical score 5.3.1.Slice 5.4. The toolbar 5.5. The fragment inputs 5.6. The canvas input 5.7. The code editor 5.8. MIDI learn functionality 5.9. The session/global settings dialog 5.10. MIDI settings dialog 5.11. Recording dialog 5.12. Outline dialog 5.13. Session chat dialog 5.14. Uniforms dialog 6. How to produce sounds by programming your GPU 6.1. OpenGL Shading Language 6.2. Pre-defined uniforms 6.3. The timbre 6.4. Drawing the fundamental 6.5. Drawing harmonics 6.6. Square and triangle waveform 6.7. Simulating pulse-width 6.8. Playing with a MIDI keyboard 6.9. Simple AR-like envelope 6.10. Morphing between parameters 6.11. ADSR envelope 6.12. Filters 6.12.1.Low-pass filter (LPF) 6.12.2.High-pass filter (HPF), Band-pass filter and Band-reject filter 6.13. Timbral possibilities 6.14. Delay effect 6.15. Sequence 6.16. Note on globalTime 7. Contributing 8. Links 9. Credits 1. Introduction The Fragment synthesizer is a collaborative web-based musical instrument which allow direct manipulation of the sound spectrum by the use of on-the-fly GPU (Graphics Processing Unit) coding. Fragment is stereophonic, polyphonic, multitimbral and support live coding of audio and visuals at the same time. Fragment main synthesis method is additive but granular synthesis and a simple sampler method is also available. Fragment has many features making it a bliss to produce any kind of sounds or visuals, it is aimed at artists seeking a real-time creative environment with direct visual feedback and few limitations to experiment with, a programmable noise-of-all-kinds software. Many videos of Fragment live sessions were recorded and are available on YouTube as a playlist. 1.1. History In 2009, i discovered the Virtual ANS synthesizer by Alexander Zolotov, a software emulation of the Russian photoelectronic synthesizer ANS which was created by the Russian engineer Evgeny Murzin from 1938 to 1958. I was blown away by the remarquable possibilities offered by the Virtual ANS which let you draw the sound spectrum over time, i then discovered programs such as MetaSynth or HighC, this is how i started to experiment with the "drawn sound" method. Fragment started in 2015, when i was making the first prototype of a web-based ANS-like synthesizer software, a prototype of Fragment was made in a single week, the prototype was quite mature but lacked in features, i considered Fragment as a pretty failed experiment at the time. In the summer 2016 while i was releasing the prototype source code, i played with it again and after tweaking the GLSL code, i was able to make some nice sounds, so i started to think about that prototype again and come up with many ideas that would make Fragment more functional and easier to use, the real work begun. After many hours spent crafting the software, the first version of Fragment was released in January 2017, it was quite limited at that time, Fragment has now improved alot. 1.2. Capabilities
1.3. System requirements Fragment is a special kind of additive synthesizer which require a moderate deal of processing power in order to work properly, a medium-end GPU and CPU should work fine. 1.3.1. Browser Fragment require a browser with full support for ECMAScript 5, CSS3, WebAudio and WebGL. Well-tested and compatible browsers include Firefox 51.x and Chrome 55.x but Fragment may work with previous version of those browsers as well. It is known to work on recent version of Safari and Opera as well. Chrome or Chromium browser is recommended. Fragment support the WebGL 2 API which improve performances, possibilities and enable advanced features in the fragment shader due to GLSL 3.0 usage. 1.3.2. CPU Fragment may be quite hungry in term of computing resources, a dual core with high clock speed is recommended, a CPU with more cores can be useful if you just want to use the browser for audio output. Several methods are provided to synthesize sounds, each with performances pros and cons:
1.3.3. GPU Fragment was developed and tested with a NVIDIA GeForce GTX 970 GPU, a powerful GPU may be required if:
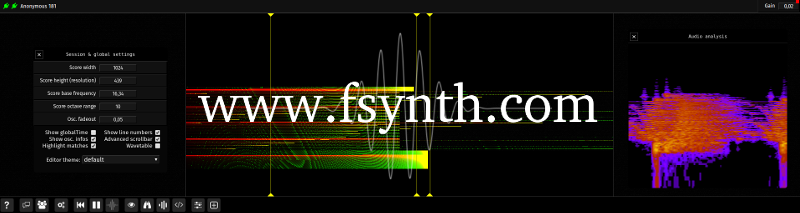
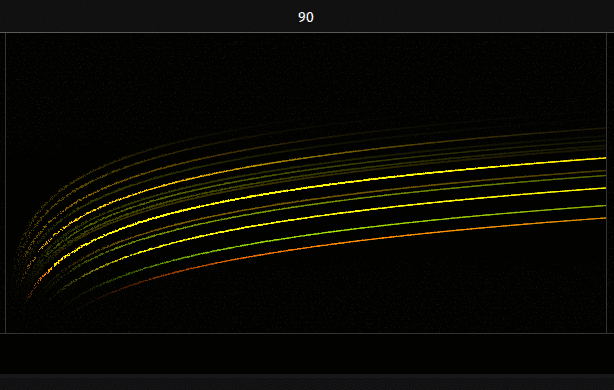
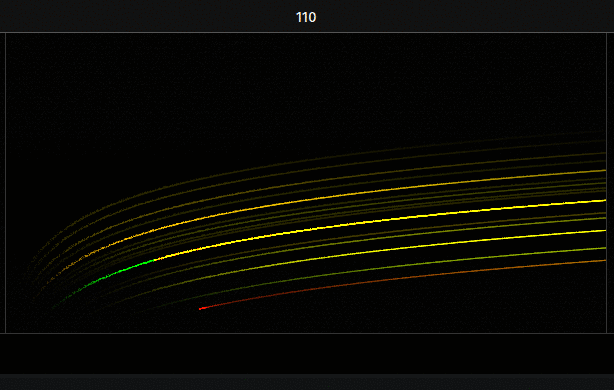
2. Concept Fragment basically capture 1 pixel wide slices of a canvas at the display refresh rate and translate RGBA pixels value to notes, the notes are then interpreted and played by one of the synthesis tool. The content of the canvas is produced on the GPU by a collaborative GLSL script, the GPU make it extremely fast and easy to do any kinds of pixels manipulations. There is many features in Fragment which allow any creative minds to produce complex sounds in different ways and even with external tools, i suggest all the readers to look at great softwares like the IanniX sequencer and to use it with Fragment using the MIDI capabilities. While Fragment may seem overwhelming at first, the only thing that is required to produce sounds with it is to know how to generate the visuals, the visuals can be drawn directly over the canvas with a canvas input, produced directly by the GLSL code, come from images, sound files, webcam etc. The goal of this section is to clarify the inner working of Fragment. 2.1. Additive synthesis Fragment is first and foremost a powerful additive synthesizer which make an extended use of additive synthesis. Additive synthesis is a sound synthesis technique that create timbres by adding sine waves together. Adding sine waves produce a timbre, the timbre quality is mainly defined by its harmonic content and the dynamic characteristics of the harmonic content. The concept of additive synthesis is centuries old, it has first been used by pipe organs. Fragment can theoretically produce any timbres with precise accuracy. The only limit to the amount of sine waves that can be added by Fragment is the limit of the available processing power. For example, on a Raspberry PI 3 (1.2GHz 64-bit quad-core ARMv8 CPU) ~700 oscillators can be played simultaneously using two cores, matching the capability of the ANS synthesizer. Actually, there is a also a hard limit which is that the frequency capture of slices cannot go beyond the refresh rate of your monitor (and this also depend on the browser implementation, commonly 60 FPS which mean ~16ms time granularity), this could however be bypassed by switching to a different monitor or disabling browser vertical synchronization. Fragment can also do other types of synthesis like granular synthesis which is only available by using the Audio Server. 2.2. The graphical score Fragment graphical score represent the sound spectrum which is generated by the GPU from a fragment program. The fragment program (also known as a fragment shader) is executed by the GPU and compute the color and other attributes of each "fragment" - a technical term which mean a single pixel. The graphical score represent a kind of sonic canvas where the X axis represent time and the Y axis represent frequencies, you "paint" the graphical score by writing a fragment program which will be executed for each pixels of the graphical score. What you hear in Fragment is determined by the position of "slices" which are added on the graphical score, slices are vertical bits of the graphical score which are merged together and produce an audible result. The content of slices is captured at the rate of the display refresh rate which conventionally should be 60fps most of the time which mean a time granularity of at best ~16ms. The frequency mapping of the graphical score is fixed by a logarithmic formula, altough the formula cannot be changed right now, some parameters are available in the settings dialog to fine tune the frequency map. The frequency mapping is defined by the formula:
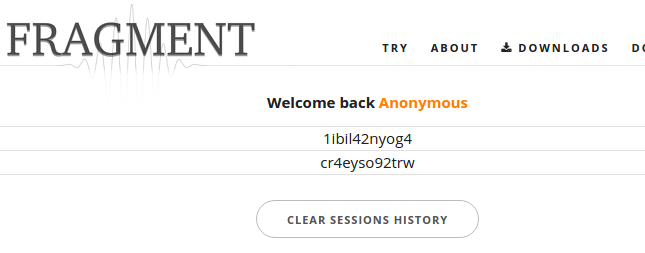
3. Sessions Fragment sessions are isolated spaces which are open to all peoples who has access to the session name, they can be joined by going to the Fragment homepage or by typing the session name directly into the address bar as demonstrated below. You can join any sessions directly from your browser address bar by replacing "yoursessionname" for the URL shown below by the session name you want to join or create, session names are limited to a maximum of 100 characters and cannot use the "$" character: https://www.fsynth.com/app/yoursessionname Fragment synchronize the code editor content, slices, canvas settings and uniform inputs across all the users in the session in real-time which mean that you can jam with your friends if you share the session URL. Note that MIDI note messages are not synchronized between users due to technical constraints but you can still add uniform inputs and assign MIDI devices to control them, their values are synchronized between users. Some settings are saved locally on your browser, some of them are global (like the username and settings related to the editor) and some of them are saved per sessions such as the MIDI settings, gain and inputs. Fragment is respectful of the user and does not store any informations related to the user outside the boundary defined by the application focus. 3.1. Homepage and sessions history The Fragment homepage can be used to retrieve the various sessions that you joined, a session list will be shown once you joined at least one session.
You can remove a session from the list by clicking on it and by clicking on the trash icon. You can also clear the sessions history by clicking on the corresponding button, it will not delete the session content, just your settings for that session and the session will removed from the list, a deleted session can be joined back from the homepage form or by the browser address bar if you know its name. 4. FAS FAS (Fragment Audio Server) is the Fragment synthesis engine as a server, it is an external independent program written with the C language for very fast real-time audio synthesis. It is recommended to use Fragment with FAS enabled. The advantage of using FAS is that it provide the best audio performances along with audio devices choice, multiple audio output per slices, sample rate choice, granular synthesis and sampler method, realtime scheduling under Linux and more... Fragment communicate with FAS by sending data through the network when the FAS option is enabled, FAS can run on any machines independently of the Fragment application, it gather the pixels data from Fragment in real-time, compute things and deliver the audio through the selected audio device. FAS can be downloaded on the Fragment homepage, it can also be compiled from sources on GitHub. FAS is provided as an executable for the following platforms at the moment:
For more informations on the Fragment Audio Server, see the newer documentation here 5. The user interface
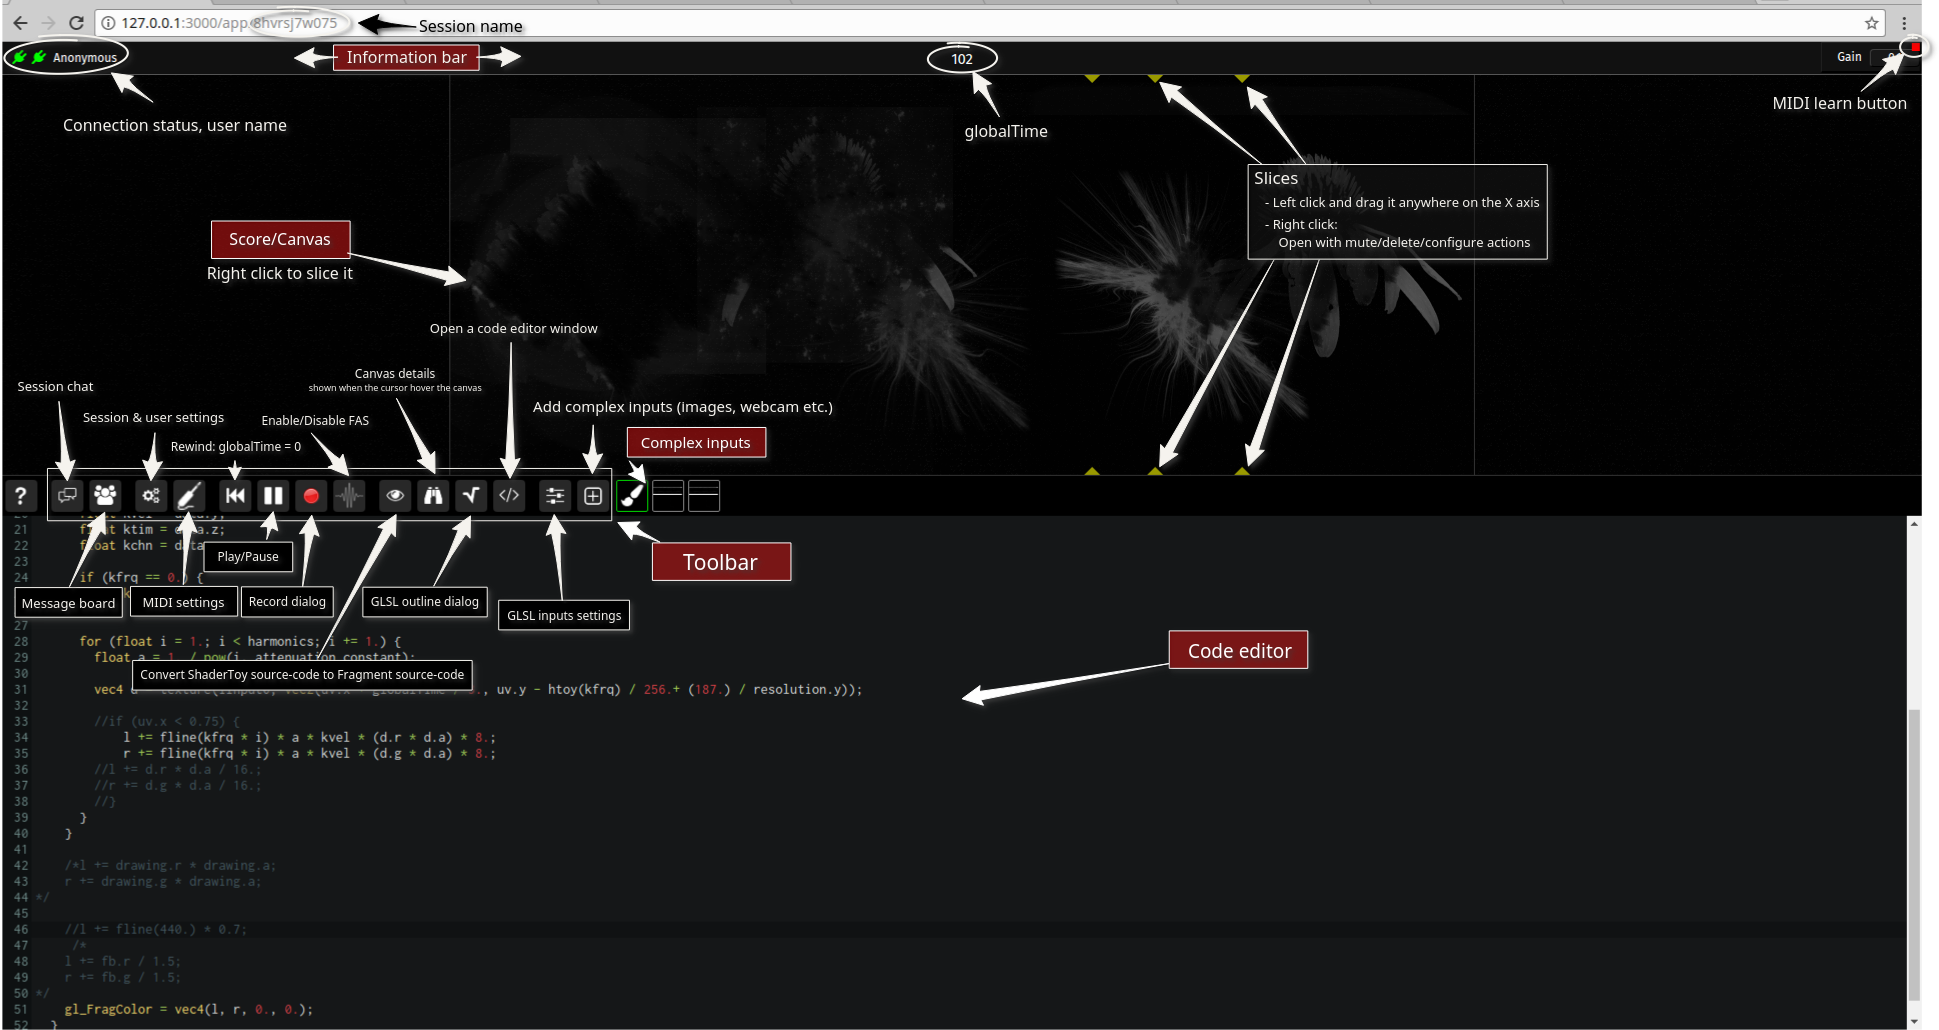
Click to view the full image It is composed of a few parts with very specific roles, below is a list of parts with detailed informations of their functions and supported actions. 5.1. Dialogs There is many dialogs in Fragment, they are composed of a title bar with some actions, the dialog content and sometimes a status bar, dialogs hover above the rest of the application, you can move them around and close them, some are also resizable, minimizable and detachable in a separate window. To resize dialogs, place the mouse cursor on the bottom right corner of the dialog, click and drag to the desired size.
Here is a list of dialog actions (in the order by which they appear from left to right):
5.2. The information bar The information bar at the top convey minor and major informations such as (in order from left to right):
5.3. The graphical score You can slice the graphical score by right-clicking on it and by clicking on the + icon, this will add a vertical bar which will capture that part of the canvas.
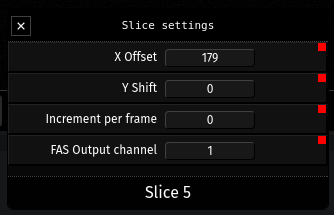
5.3.1. Slice Slices are an important part of Fragment, there will be no sounds if you don't add at least one slice. The purpose of slices is to capture the pixels of vertical parts of the canvas which will be fed to the audio synthesis engine, they are like turntable needles, they can be dragged around in real-time by the mouse or by a MIDI controller, you can use programs like IanniX to move them following certain kind of patterns. Slices can be moved by dragging them on the X axis, to do so, maintain the left mouse button on a slice and move the mouse cursor around on the horizontal axis.
5.4. The toolbar
The toolbar is a collection of tools and settings which are grouped by sections, here is a detailed list of the toolbar items (in order from left to right):
5.5. The fragment inputs Fragment inputs are complex inputs which can be used in the fragment program as a 2D texture. The fragment inputs panel is a complete list of all the added inputs, each of them appear as a thumbnail near the add complex inputs button, nothing will be shown if no complex inputs were added. All complex inputs can be used as 2D textures (texture2d) within the fragment program, they are defined as iInputN where N is the id of the input starting from 0. You can find the input id by hovering over the thumbnail or in the title of the complex input settings dialog.
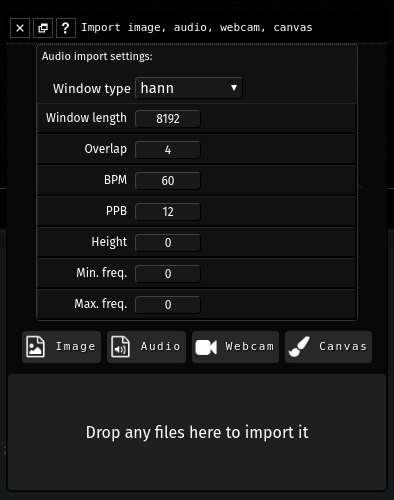
Complex inputs can be ordered in real-time by drag & drop. To open the complex input import dialog, click on the "add complex inputs" button, a new dialog will appear with three sections:
Once added, by left clicking on a complex input thumbnail the following actions appear:
By rick-clicking on the input thumbnail of a canvas input, the canvas input will be selected and a "paint tools" dialog will appear
The complex input settings dialog The complex input settings dialog have several options:
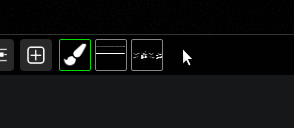
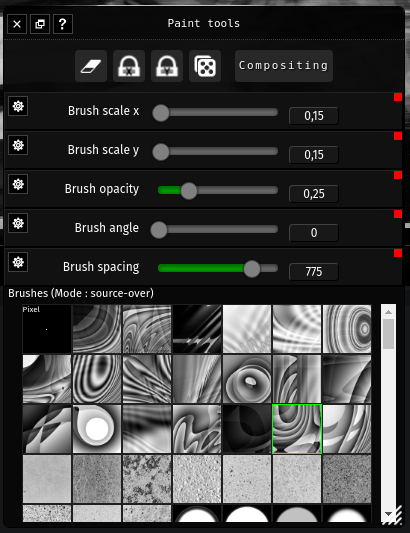
5.6. The canvas input The canvas input is a powerful feature which allow to draw on a canvas with brushes, the canvas is usable within the fragment shader as a texture which is updated as you draw on it. When you right click on the canvas input thumbnail, the canvas input will be selected and appear with green borders, the canvas content will appear in front of the graphical score and a paint-like tools dialog will open. You can directly draw on the graphical score when a canvas input is selected but you cannot move or add slices anymore, you must unselect the selected canvas input before. A right click on a selected canvas input thumbnail will unselect it. Brushes can be added by adding complex inputs images from the import inputs dialog. Brushes can be selected by clicking on the corresponding brush thumbnail. Any actions affecting brushes will display an overlay helper for some seconds to help you visualize the changes. To draw on the canvas input, you must first select a brush in the "paint tools" dialog, Fragment is bundled with 20 high-quality brushes and 949 are available as a separate download.
The "paint tools" dialog has three parts, a toolbar, brush settings and the brushes list.
5.7. The code editor The code editor is one of the most important Fragment since it allow the user to generate the visuals which are fed to the audio synthesis engine. GLSL code is what you type in the code editor to generate the visuals. The fragment program is compiled as you type, if the compilation fail, the code editor will notice you with a floating message and with a red message at the lines that cause the compilation to fail, all of that without interrupting sounds/visuals output, this enable powerful live coding.
The changes that you make in the code editor are automatically saved per named sessions, changes are also synchronized in real-time between all the users of the session you are currently in, this is the collaborative nature of Fragment. The code editor is powered by the CodeMirror library, it feature many neat things such as:
If you experience audio stuttering as you type, it is recommended to detach the code editor off the main window, due to the complexity of the web and the complexity of the Fragment application, many things are not as optimal as they should be, you may hear audio crackles due to browser reflow. 5.8. MIDI learn functionality MIDI learn is a neat feature of Fragment which enable any MIDI learn enabled widget to be controlled by a MIDI controller.
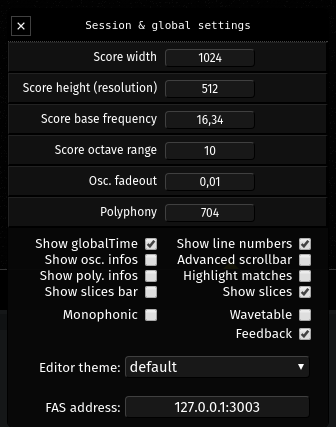
The red square indicate MIDI learn functionality support for this widget By left clicking on the red square, it turn green and any inputs from the enabled MIDI devices will be captured by the widget. Once the MIDI input is captured, the green square become red again (which is a locked state) and the MIDI control will be assigned to the widget. It is possible to reset the MIDI control assigned to the widget by clicking on the red square and clicking again on the green square aka double clicking. 5.9. The session/global settings dialog
The session & global settings dialog content (in order from top to bottom):
5.10. MIDI settings dialog
The MIDI settings dialog show all the MIDI input devices found at this time, by default there is no MIDI input devices enabled, you can enable MIDI devices by checking the checkbox below the MIDI device name. Once enabled, Fragment will receive any MIDI messages from that device. Fragment support hot plugging of MIDI devices, any MIDI devices which are plugged or unplugged while Fragment is running will be added or removed in the MIDI settings dialog. Fragment keep track of your MIDI settings choice for particual devices per sessions, this mean that if a MIDI device is enabled, when you quit Fragment or that the MIDI device is unplugged and you launch again Fragment and that the MIDI device is plugged in, Fragment will enable it automatically. 5.11. Recording dialog The recording dialog allow to continuously record the slices output from all channels into one score that you can export to PNG by clicking on the save icon. This tool can become handy if you want to export your work and import it into an external tool or within Fragment again by clicking on the [+] icon. Can also serve for spectral analysis. The recording dialog support mixing functions, for example by clicking on the + icon, the recording will be additive which mean that slices content will be drawn on the previous content without erasing it, a list of all the toolbar actions can be found below. The recording canvas width is linked to the score width. Recording toolbar buttons (in order from left to right):
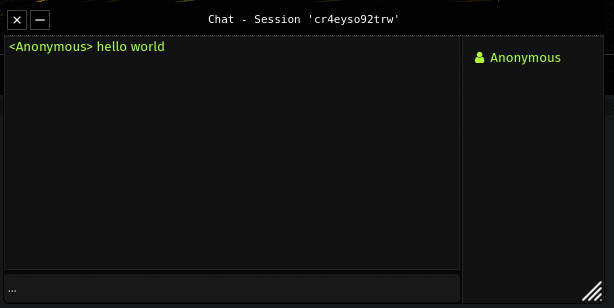
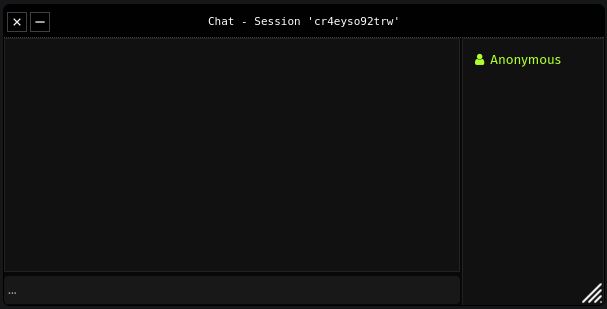
5.12. Outline dialog The outline dialog display a list of GLSL functions, declarations and "defines" defined in your shader code, you can click on any elements to jump at it in the code editor, this is very useful with long shader code. 5.13. Session chat dialog
It is a simple but effective chatbox that you can resize, move around or detach. it has three parts:
You can send a message to all users in the session by clicking on the input then typing your message and pressing ENTER. Each messages received has a timestamp assigned that you can read by hovering your mouse cursor on the message. 5.14. Uniforms dialog The uniforms dialog is a very powerful functionality. It enable you to define fragment program uniforms (aka variables) which are synced with all users in the session and are controllable by any MIDI input devices enabled. All the uniforms added will be shown in the uniforms dialog and will be defined automatically in the fragment program, you can then just use the symbol name in the code editor. You can add the following scalar uniforms types:
You can also add vector uniforms of the following types (note: the components field determine the number of components for the following uniform type):
6. How to produce sounds by programming your GPU Fragment usage of the GPU is restricted to a single fragment program which will be executed by the GPU for each pixels of the graphical score. The fragment program is written in GLSL (OpenGL Shading Language) which has a syntax quite similar to the C language but is much simpler to learn. You can do anything from ray-traced 3D to drawing simple lines and define their behaviors with Fragment, the only requirement is high school mathematics. Fragment support GLSL 3.0 version automatically if it detect support for the WebGL 2.0 API (which is recommended), GLSL 3.0 allow to use dynamical indexes with arrays among many other things, it also allow to use shortcuts such as fragColor instead of gl_FragColor and texture instead of texture2D. If WebGL 2.0 is supported, there is actually two output in the fragment shader, gl_FragColor or fragColor for the visuals and synthOutput for the pixels data which will be used by the audio synthesis engine, this allow to do visuals alongside stereo audio synthesis, when WebGL 2.0 is enabled and the EXT_color_buffer_float extension is available, the pixels data output will be encoded as 32-bit float, this give higher quality sounds and possibilities. This documentation focus on the audio synthesis aspect of Fragment as there is already plenty resources covering the creation of stunning visuals with GLSL programs on the web. There is also many applications that let you create stunning visuals in your browser by the same method, one of the most popular one and compatible with Fragment (by using the convert ShaderToy button of the toolbar) is ShaderToy, this program let you build visuals and audio at the same time, just like Fragment but with a more conventional approach to audio synthesis. 6.1. OpenGL Shading Language The Khronos Group (authors of the language specification) released several reference cards of the GLSL specification, the reference cards are compact reference of the full language specification which can be used in conjunctions with code samples to learn the OpenGL Shading Language quickly. Since there is plenty of resources to learn the OpenGL Shading Language, the documentation provided in this section will only provide the official reference cards which are enough to learn from to understand all the GLSL code that will follow. As Fragment can use WebGL 2.0 if your browser has support for it, the reference cards for both WebGL 1.0 GLSL and WebGL 2.0 GLSL (more functionalities) is provided, keep in mind that if Fragment run fine with your browser, you can safely use the WebGL 1.0 GLSL reference card as a starting point:
Here is a simple example of GLSL code that Fragment accept which just set all pixels to black and all oscillators to off: void main () { gl_FragColor = vec4(0., 0., 0., 0.); synthOutput = vec4(0., 0., 0., 0.); // WebGL 2.0 only }In the subsequent GLSL code, blue words are GLSL keywords, red are float values and green words are pre-defined specific definitions or functions. 6.2. Pre-defined uniforms Fragment has many pre-defined uniform variables which can be used to animate/modulate things, here are all the pre-defined uniforms along with their type that can be used directly in your code:
6.3. The timbre It is difficult to define precisely the attributes of a complex sound, simplistic models would say that all complex sounds are a combination of a fundamental frequency and the harmonics which are integer multiple of the fundamental frequency but as you can find on the Wikipedia article on timbre, there is many more attributes. Here is an excerpt of timbre major attributes by Robert Erickson taken from the Wikipedia page:
6.4. Drawing the fundamental The fundamental is the simplest constituent of our timbre (its pitch and lowest frequency) and also the fundamental basis for building the harmonics (also called overtones) etc. We will produce a fundamental by drawing a horizontal lines and later on its harmonics, all of that will constitute all the frequencies contained by our sound (aka harmonics, partials etc.), those horizontal lines will have several conditional transformations and other processing applied to them later on to produce complex sounds. Here is how to draw a horizontal line which will produce a fundamental 440Hz sine wave: void main () { float frequency = 440.; float l = 0.; float r = 0.;
6.5. Drawing harmonics Harmonics (also called overtones) are defined as positive integer multiple of the frequency of the fundamental. We will extend the previous code by adding a loop: void main () { float l = 0.; float r = 0.; float base_frequency = 440.;
We can fix that by attenuating the higher frequencies, this is similar to the concept of filters in common synthesizers, this is really important as harmonics amplitudes is an important parameter for timbre quality, for example, by decreasing the amplitude of our harmonics gradually, we can create a sawtooth wave, an exponential attenuation provide good result generally in audio due to the way humans brain interpret sounds, we could also just attribute different intensity for each of our harmonics: void main () { float l = 0.; float r = 0.; float base_frequency = 440.;
6.6. Square and triangle waveform We can now produce many basic/common waveforms such as a square wave or triangle wave which has only odd partials: void main () { float l = 0.; float r = 0.; float base_frequency = 440.;
6.7. Simulating pulse-width Pulse-width is a feature commonly found in analog synthesizer, by changing the width of a pulse it is possible to change the harmonic content, it goes from a square wave at 50% and approach the sound of a crisper sawtooth wave near 0%. // #define statement cannot begin on the first line in Fragment #define pi 3.141592653589
Within Fragment, the pulse-width is just one of the unlimited way to change the harmonic content of a timbre. 6.8. Playing with a MIDI keyboard You must have a WebMIDI supported browser (such as Chrome or Opera) to use MIDI messages with Fragment. Once your MIDI keyboard is plugged in, you can go in the Fragment MIDI devices dialog and enable it. The MIDI data will now be available in a pre-defined vec4 array named keyboard, the array length * 2 is the actual polyphony capability of Fragment, the array contain a series of vec4 items, two vec4 items contain:
Here is how you can use a MIDI keyboard: void main () { float l = 0.; float r = 0.;
You might find the loop kind of weird, why we don't just loop over all available note-on messages? This is because the default GLSL spec. with WebGL is quite limited when it come to loop features... for example, it does not allow dynamicals indexes however you can use dynamical indexes if your browser has support for WebGL 2. All the examples below will use the GLSL version that is the most compatible, if your browser has support for WebGL 2 you can replace this line :
for (int k = 0; k < 16; k += 2) {
by this line :
for (int k = 0; k < keyboard.length(); k += 2) {
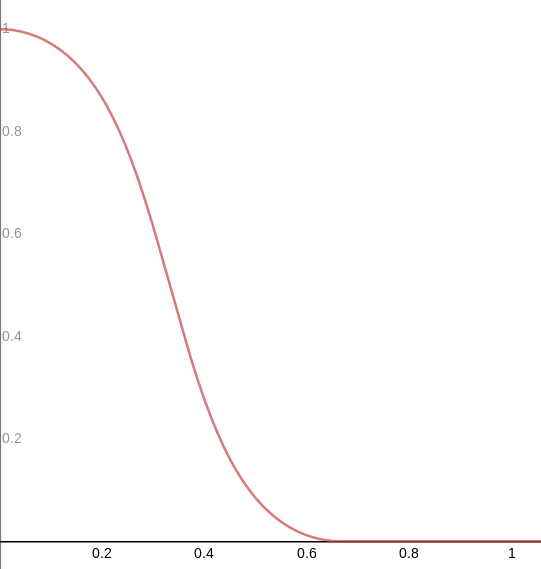
6.9. Simple AR-like envelope Our timbre is nice but still too simple, we can fix that by applying an envelope, a mathematical function which will determine the timbre behavior by taking into account the elapsed time when we hit the keys of our MIDI keyboard. Fragment allow any envelopes to be done by mathematically defining them, one of the simplest envelope is AR (Attack and Release): // a simple function which define // smooth AR-like envelopes, fast attack and slow decays // plot it or see the details of this function below // it's maximum, which is 1.0, happens at exactly x = 1 / k // use k to control the stretching of the function float impulse(float k, float x) { float h = k * x; return h * exp(1.0 - h); }
Here is a good preview of the envelope models that the impulse function generate:
The sound is still not very interesting yet but now that we know how to generate the envelope, we can do many things such as applying a different envelope to each harmonics: float impulse(float k, float x) { float h = k * x; return h * exp(1.0 - h); }
6.10. Morphing between parameters We will now look into getting a better timbre by morphing parameters such as the attenuation or frequencies, due to the nature of Fragment, almost everything can be morphed easily by using mathematical functions: float impulse(float k, float x) { float h = k * x; return h * exp(1.0 - h); }
This is just an example but you can now imagine the amount of possibilities, very complex timbres can be created easily by applying custom functions and mixing between several parameters! For example, we could do a tremolo or vibrato effect very easily by modulating our harmonics or frequencies quickly! Fragment offer a limitless landscape for any creative minds willing to experiment. 6.11. ADSR envelope We will now replace our AR envelope by the more complex ADSR envelope, ADSR mean Attack, Decay, Sustain, Release, this is a classic and is the most commonly used envelope, this will enhance our possibilities. float adsr(float t, vec4 v, float s) { v.xyw = max(vec3(2.2e-05), v.xyw); // attack term float ta = t/v.x; // decay / sustain amplitude term float td = max(s, 1.0-(t-v.x)*(1.0-s)/v.y); // length / release term float tr = (1.0 - max(0.0,t-(v.x+v.y+v.z))/v.w); return max(0.0, min(ta, tr*td)); }
6.12. Filters Filters play an important role in sound design, we will see in this section how to apply more powerful and flexible filters with parameters that we can modulate, we will especially recreate generic filters such as low-pass, high-pass etc. 6.12.1. Low-pass filter (LPF) A low-pass filter is a filter that passes signals with a frequency lower than a certain cutoff frequency and attenuates signals with frequencies higher than the cutoff frequency. We will use the low-pass filter as a prototype filter, which mean that we will build all the other filters from this one.
The graph of the lpf(x, 0., 1.5) function The attenuation function that we have used so far is a kind of simple low-pass filter. float adsr(float t, vec4 v, float s) { v.xyw = max(vec3(2.2e-05), v.xyw); float ta = t/v.x; float td = max(s, 1.0-(t-v.x)*(1.0-s)/v.y); float tr = (1.0 - max(0.0,t-(v.x+v.y+v.z))/v.w); return max(0.0, min(ta, tr*td)); }
float adsr(float t, vec4 v, float s) { v.xyw = max(vec3(2.2e-05), v.xyw); float ta = t/v.x; float td = max(s, 1.0-(t-v.x)*(1.0-s)/v.y); float tr = (1.0 - max(0.0,t-(v.x+v.y+v.z))/v.w); return max(0.0, min(ta, tr*td)); }
6.12.2. High-pass filter (HPF), Band-pass filter and Band-reject filter Now that we have made a low-pass filter, we can build all the other filters easily: float adsr(float t, vec4 v, float s) { v.xyw = max(vec3(2.2e-05), v.xyw); float ta = t/v.x; float td = max(s, 1.0-(t-v.x)*(1.0-s)/v.y); float tr = (1.0 - max(0.0,t-(v.x+v.y+v.z))/v.w); return max(0.0, min(ta, tr*td)); }
6.13. Timbral possibilities A neat thing that can be done with Fragment is modulating the parameters you want with the current horizontal or vertical position, the canvas will then show you the timbral possibilities along the chosen axis that you can chose to listen to by adding and positioning slices on the canvas, you can also modulate the horizontal position to move between timbral possibilities. By adding many slices at different positions, you can build very complex sounds and explore without having to write code. float adsr(float t, vec4 v, float s) { v.xyw = max(vec3(2.2e-05), v.xyw); float ta = t/v.x; float td = max(s, 1.0-(t-v.x)*(1.0-s)/v.y); float tr = (1.0 - max(0.0,t-(v.x+v.y+v.z))/v.w); return max(0.0, min(ta, tr*td)); }
Timbral possibilities along the X axis related to a LPF cutoff parameter 6.14. Delay effect Now that we have all the essential components of any modern synthesizers, we can do some more complex things like effects, arpgeggio, sequences, filters etc. Coming soon... 6.15. Sequence We will see in this section how to do a 16 or N steps sequences with Fragment, we will use the uniforms dialog to define an array of values which will hold the frequency data of our sequence. You can do that by opening the uniforms dialog and then adding an array of uniforms named sequence as pictured below:
Many values should appear now in the uniforms dialog, you can change the frequency value for each steps with your keyboard, mouse or by assigning a MIDI control to each steps. Here is the code to play a sequence automatically: // we define the PI constant // note: the "#define" keyword cannot start on the very first line #define pi 3.141592653
An autonomous sequence is relatively easy and can also be done by using the mod function or by simpler means. We strongly recommend that peoples use Fragment with a MIDI sequencer such as LMMS, IanniX, Renoise, MusE or any other MIDI capable sequencers, sequences can be done very easily within a sequencer and many effects can be added to the audio output. 6.16. Note on globalTime The global time is one of the most important pre-defined variable in Fragment, it is a playback time that increase continually as soon as you hit the play button on the toolbar, it can only be reset or paused by using the corresponding toolbar button, the global time is a precise clock which can be used to trigger events and dynamically alter the visuals. 7. Contributing Fragment is a free and open source software released under the term of the BSDv2 license. Any contributions from the documentation to the synthesis engine are welcome! The source code is available on GitHub. FAS source code is also available on GitHub. 8. Links 9. Credits
Thank you! last update: 2017-11-19 |